How to Use Hair Gloss
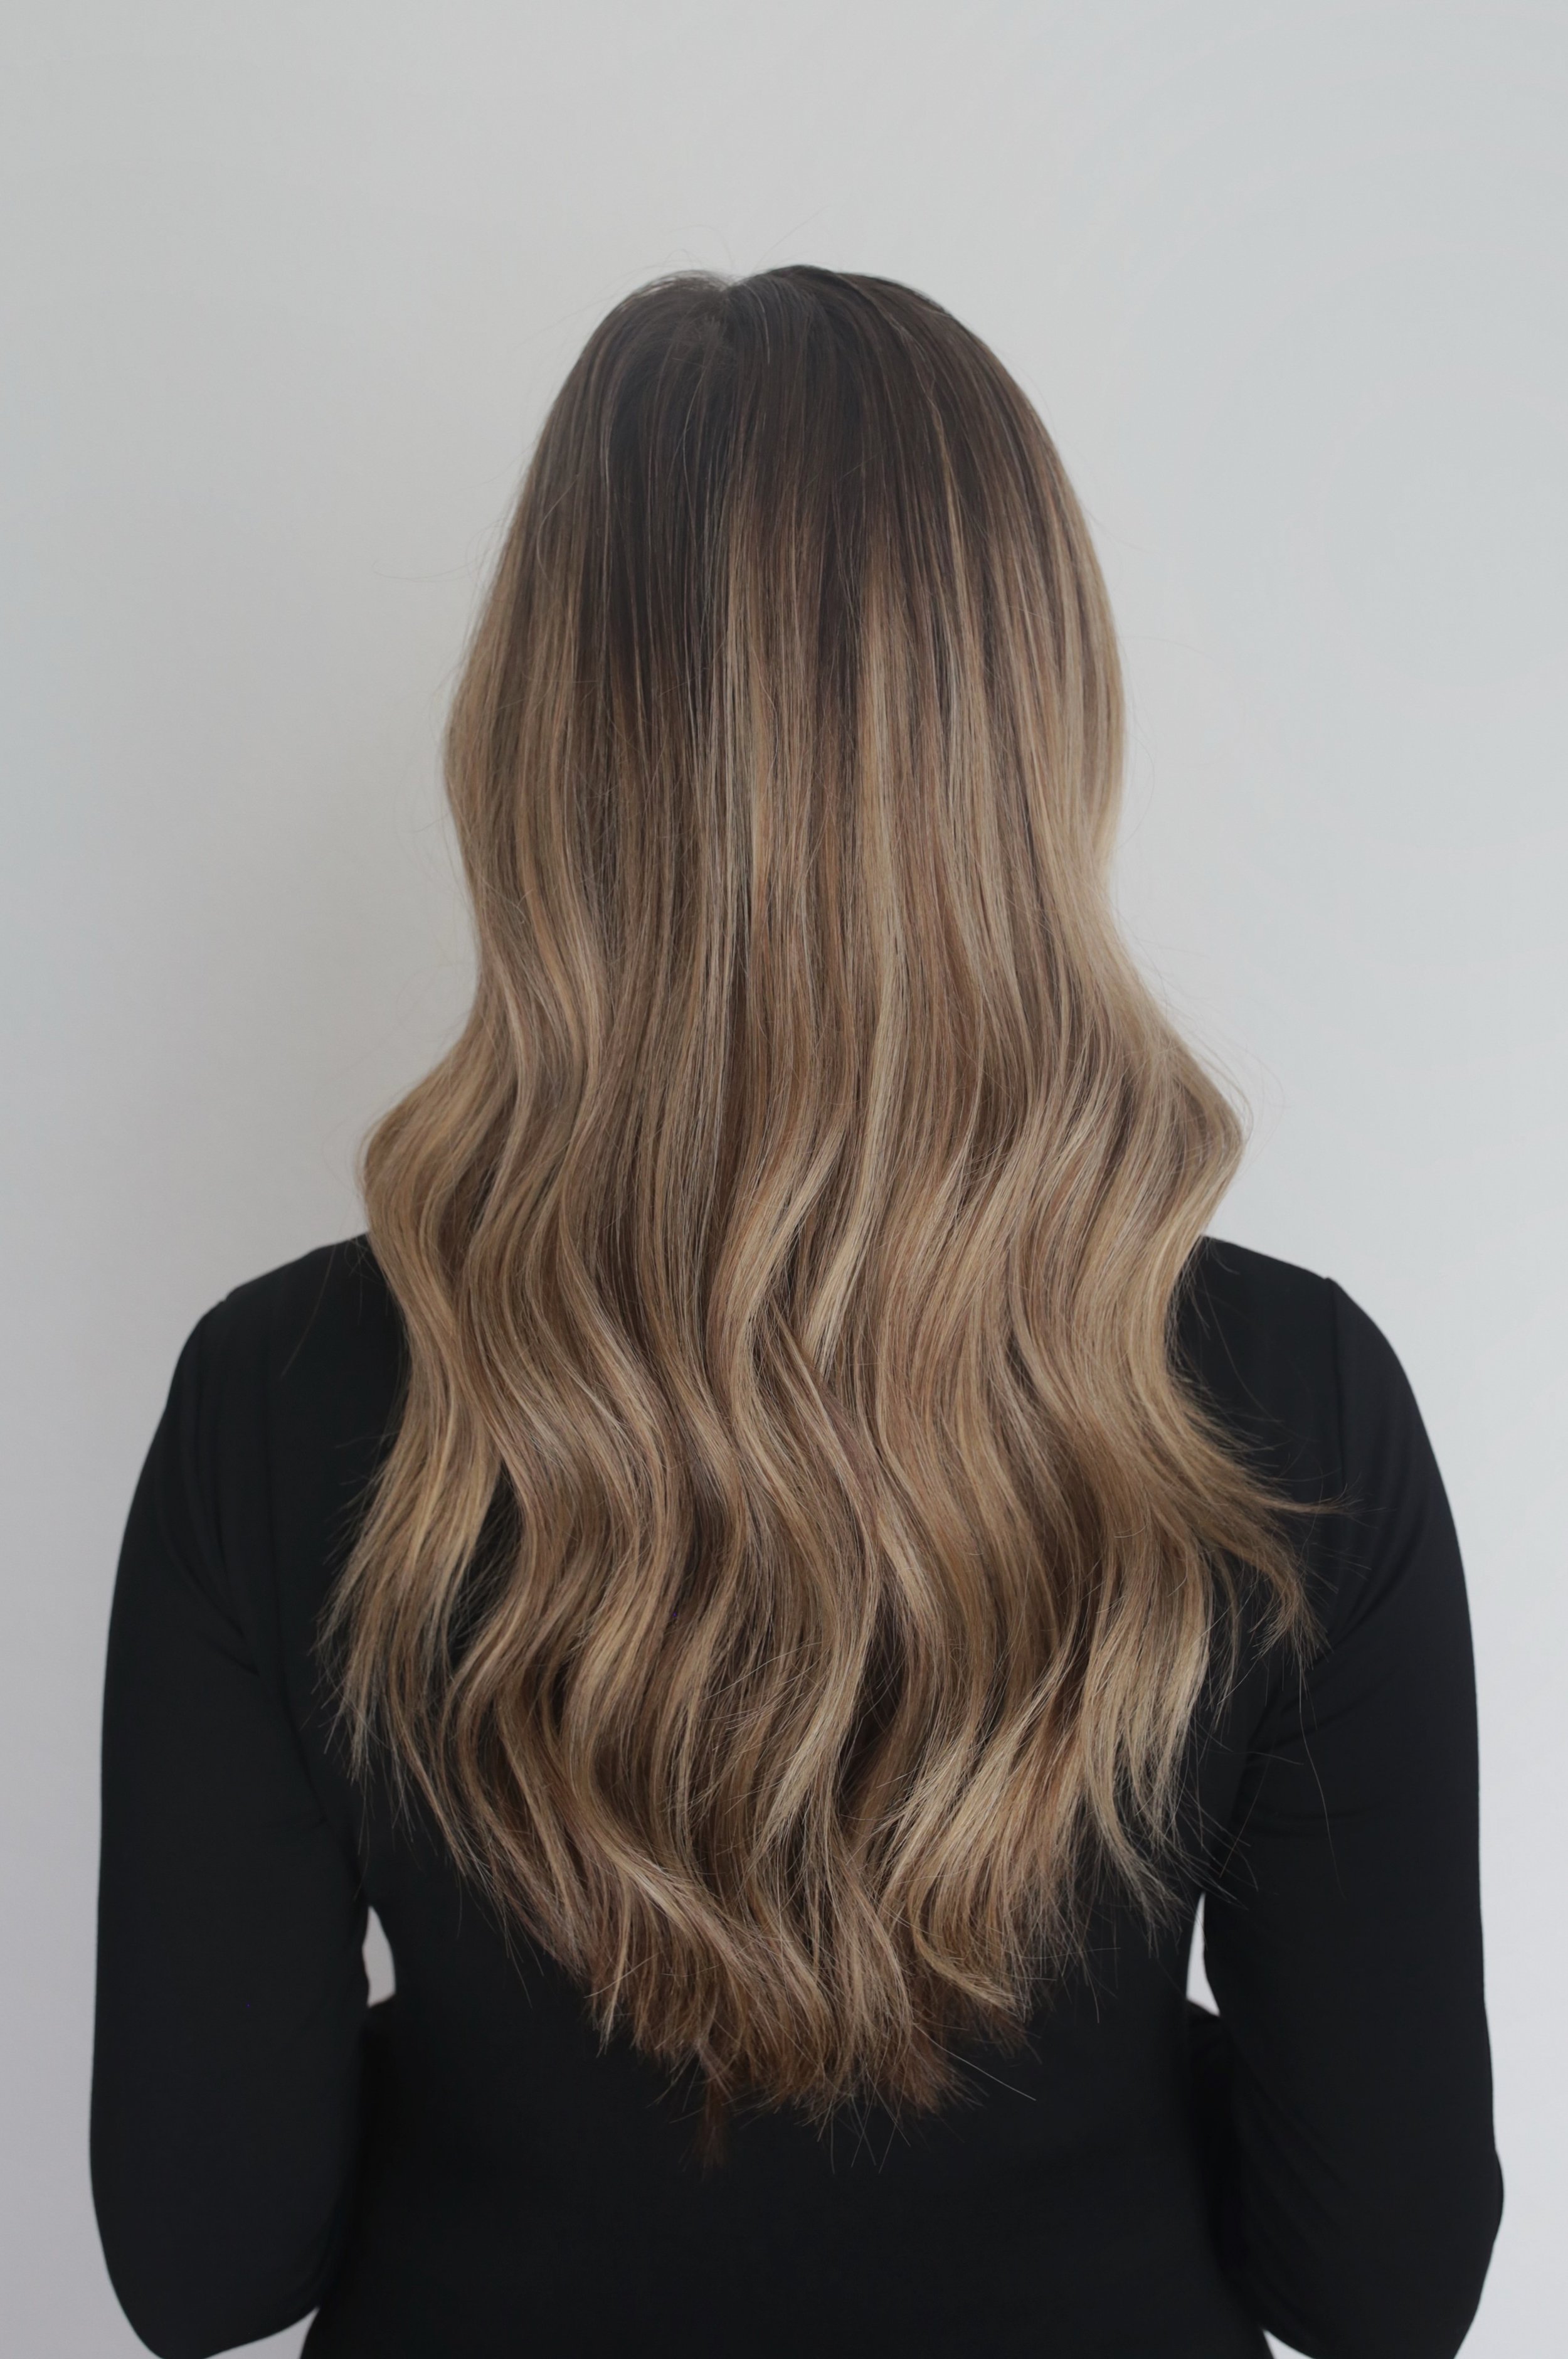
Whether you have highlights, color-treated hair, or embrace your natural color, a hair gloss is one of my favorite secret weapons to feel more put together and look a little more polished. Easy to do at home with options for every price range, hair glosses are meant to add tons of shine, enhance color, reduce frizz, and smooth hair. Some also have deep conditioning properties, which repair damage and help nourish dry or brittle hair.
I’m a huge fan of hair glosses, and I was surprised to find that so many of my friends and family members have either never heard of them, thought they were salon-exclusive, or struggled to try the at-home versions. That’s why I decided to put together this guide on how to use hair gloss. I break down the pros, cons, tips to get the most out of a gloss, mistakes to avoid, and my favorite at-home glosses for every budget. Let’s jump in.
how to use hair gloss
what is hair gloss and what does it do?
Hair glosses are simple treatments that boost shine, reduce frizz, enhance your color (salon-curated or natural), and give you an overall polished, glowing look. A hair gloss gives your hair a quick, healthy boost, making them the perfect at-home treatment to do in between salon visits.
pros
Adds shine
Smooths and reduces frizz
Enhances your hair color (whether natural or color-treated)
Easy to use
Quick
Gentle; minimal risk of damage if applied correctly
Makes your hair more vibrant
Most are color-safe
Some deep condition the hair
Some protect against UV rays and chlorine
Typically lasts a few weeks depending on how often you wash your hair
cons
Some have strong scents
Cannot lighten hair or fully cover grey
Temporary treatment; will not solve long-term, severe damage
Tinted glosses can be messy
Tinted glosses can apply and fade unevenly
Not a one-time treatment; results are temporary
how to use hair gloss at home, step by step
Hair glosses may seem intimidating, but they’re extremely to use. While the instructions may vary by product, these steps generally apply to most hair glosses, and I’ve broken them down into baby steps so they’re easy to follow.
pre-step:
Check to see if you need to cut the top off of your gloss (sometimes they have a tube applicator). I don’t keep scissors in my shower and hate having to go find some last-minute.
That said, you don’t necessarily have to do that. I personally am limited on counter space, and once the tip of the bottle is cut, you can’t lay the gloss flat without it spilling everywhere. I’ve used tons of glosses, and while the nozzle is helpful, I prefer to pour it into my hands instead. It’s just easier storage for me. The one exception is with a watery gloss like Davines Oi Liquid Luster. Pouring into your hands runs the risk of wasting way too much, so that’s my exception to the rule. But when it comes to thicker, conditioner-like consistencies, I prefer to pour into my hands. Just be sure to make sure you get all parts of your hair to ensure an even application all over.
step one: brush out all tangles from your hair.
While glosses can be conditioning, they are not deep conditioners and are sometimes applied before or in replacement of conditioners, so you want to make sure your hair is tangle-free to start with. I like using a Tangle Teezer whenever I use a gloss. My hair isn’t prone to tangles, but I always seem to get a few knots during the gloss process and a Tangle Teezer seems to be the most effective at minimizing the amount of tangles I get.
step two: shampoo your hair regularly.
You want freshly washed hair when you apply a gloss. Use your normal shampoo, though I’d advise against a clarifying shampoo, since they can be drying. I like a simple hydrating shampoo; drugstore shampoo works just as well so don’t feel like you need to get fancy.
One thing to keep in mind: some glosses will have you add conditioner prior to the gloss, so check the label’s instructions.
step three: make sure your hair isn’t tangled post-shampoo.
I swear the secret to a simple gloss application is making sure your hair is tangle-free at every step! So while this seems unnecessary, I regret it every time I skip the post-shampoo tangle-check. You don’t need to use a shower comb or anything fancy; just run your fingers through your hair to make sure the shampoo didn’t cause any knots. Hair is at its' most fragile state when it is wet, so if I notice tangles, I’ll use the tiniest bit of conditioner to brush them out (barely a dime-sized amount).
step four: partially towel dry your hair, leaving it slightly damp.
Glosses are typically most effective when applied to barely damp hair (again, check your label to be sure). You really can’t go wrong with this step, so don’t overthink it. Sometimes I towel dry it, sometimes I just wring my hair out in the shower and call it good enough. As long as you get most of the moisture/ water out of your hair, you’re set.
I will say, though, if your hair is almost dry, you might get a few tangles in the process, so if anything, lean closer to damp-wet than damp-dry.
step five: apply the gloss.
First things first: if you have a color-depositing or tinted hair gloss, you will 100% want to section your hair to ensure an even application, regardless of hair length or type.
For clear glosses, you may want to section your hair, but it’s not necessary (check the label). I have long, fine hair, and only section my hair if the gloss has a watery consistency (like the Davines Oi Liquid Luster). If it has a conditioner-like texture (ex: Amika, Pureology, Ouai), then I won’t.
Another thing to keep in mind: follow the amount of gloss recommended specifically! Hair glosses are not the type of hair product where more = better or stronger results. Using too much gloss can leave your hair greasy, dry, or heavy (not to mention the potential problems too much color-depositing gloss can lead to). That’s not to scare you, just to let you know that even if it seems like a small amount, the gloss will still be effective and give you great results.
The secret is to apply evenly from root to end. You may find it beneficial pour the directed amount of gloss into a little plastic bowl, and then scoop and apply a little at a time to ensure the gloss doesn’t get “stuck” in one spot. If your hair is on the wetter side of damp, it’ll be easier to blend the gloss throughout.
Most glosses require a 5-15 minute application time. If you’re using a color-depositing or tinted hair gloss, I would set a timer and follow it devoutly. For clear glosses, you don’t have to be as strict. I like that the Amika gloss is one you can wash out in a minute; it’s perfect for girls on the go or those with tight schedules. I typically stick to the lower end of application time because I’m impatient or applying the gloss in the shower and unfortunately don’t love long showers - 5 minutes is typically my max for gloss application time, but you aren’t going to “overdo” the gloss if you stick to the full application time.
step six: rinse the gloss out.
Rinse the gloss out. Some glosses mention following up with conditioner, but it’s not necessary. If I notice tangles during the rinsing process, I’ll again take a dime-sized amount of conditioner and target just the tangles.
If you have fine hair, don’t use conditioner unless the directions specifically say to, or you risk weighing your hair down and having it feel greasy (it’s happened to me).
step seven: dry and style your hair normally.
Once you rinse the gloss out, you can follow your normal haircare routine. I like to apply a leave-in conditioner to “seal” the shine and add hydration to my hair. This one also works as a detangler and heat protectant; love a multi-use product.
While hair glosses do a lot for your hair, they aren’t heat protectants, so make sure to use one before heat styling your hair. The gloss should last about 12-20 washes, and I recommend using one every 4-6 weeks (or in between salon visits).
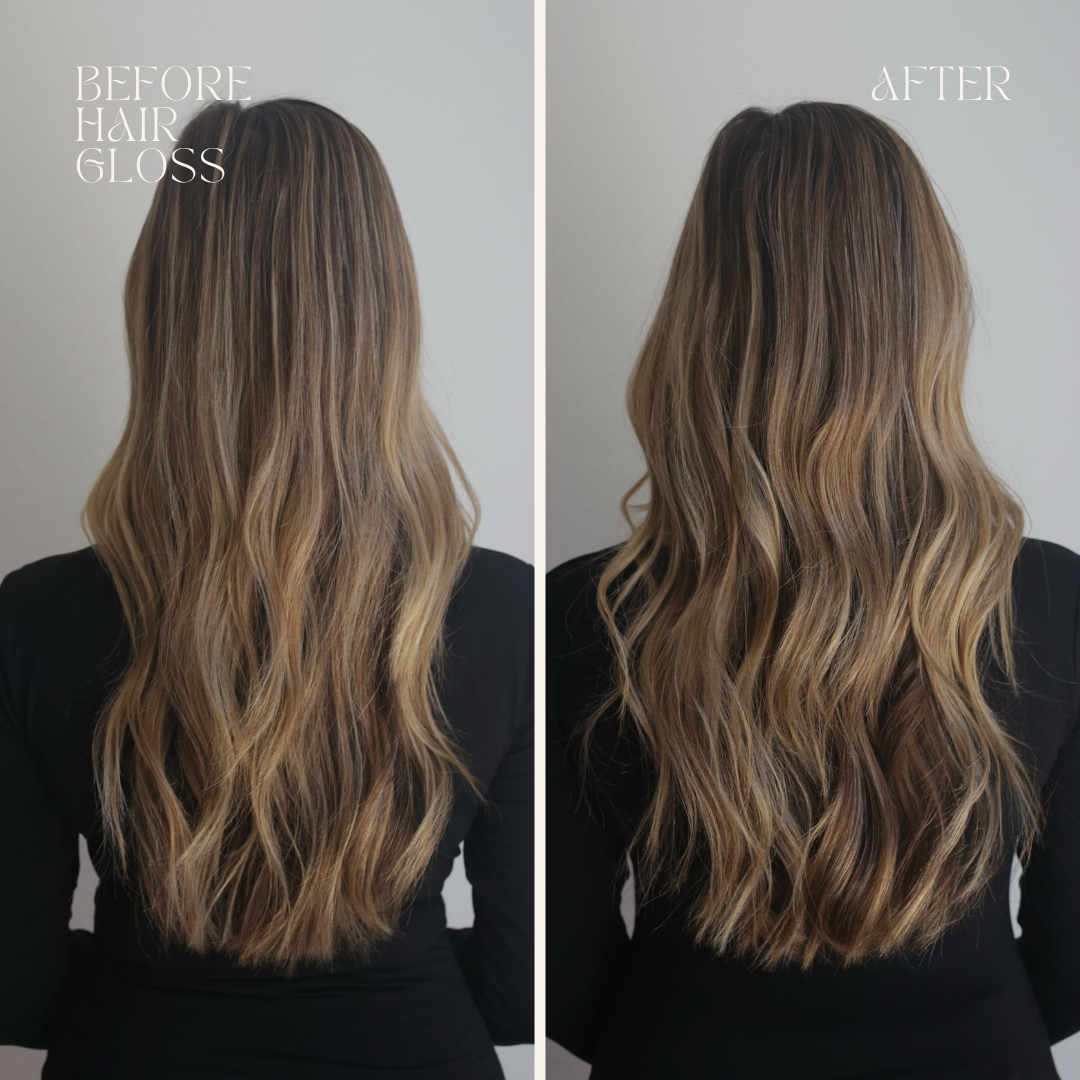
hair gloss before and after
best at-home hair glosses
Personally, I stay away from color-depositing or tinted hair glosses. Not saying there aren’t great ones out there, but it’s really hard to get a good match, even if you have all-over hair color. Some glosses will market themselves as temporary, but include semi-permanent hair color that’s really hard to get out (especially if you’ve never dyed your hair before). Unless your stylist has recommended a specific shade to you, I recommend sticking with a clear gloss. Some of my favorite at-home clear glosses:
Amika Flash Instant Shine Mask - If I had to pick one gloss that I’d recommend for all hair types, this would be the one. My friends with thick hair love this just as much as I do, and it delivers glossy shine on all hair colors - from pastel to blonde to natural; it’s like the gloss version of Sisterhood of the Traveling Pants. Priced fairly at $32, it only needs to be left in for 60 seconds and delivers salon-like shine while smelling incredible (Amika’s signature scent is an amber vanilla - not too sweet, not too earthy). If you want to try a hair gloss but also need deep conditioning, this is the one to try. For tips on using plus my result photos, check out my full review.
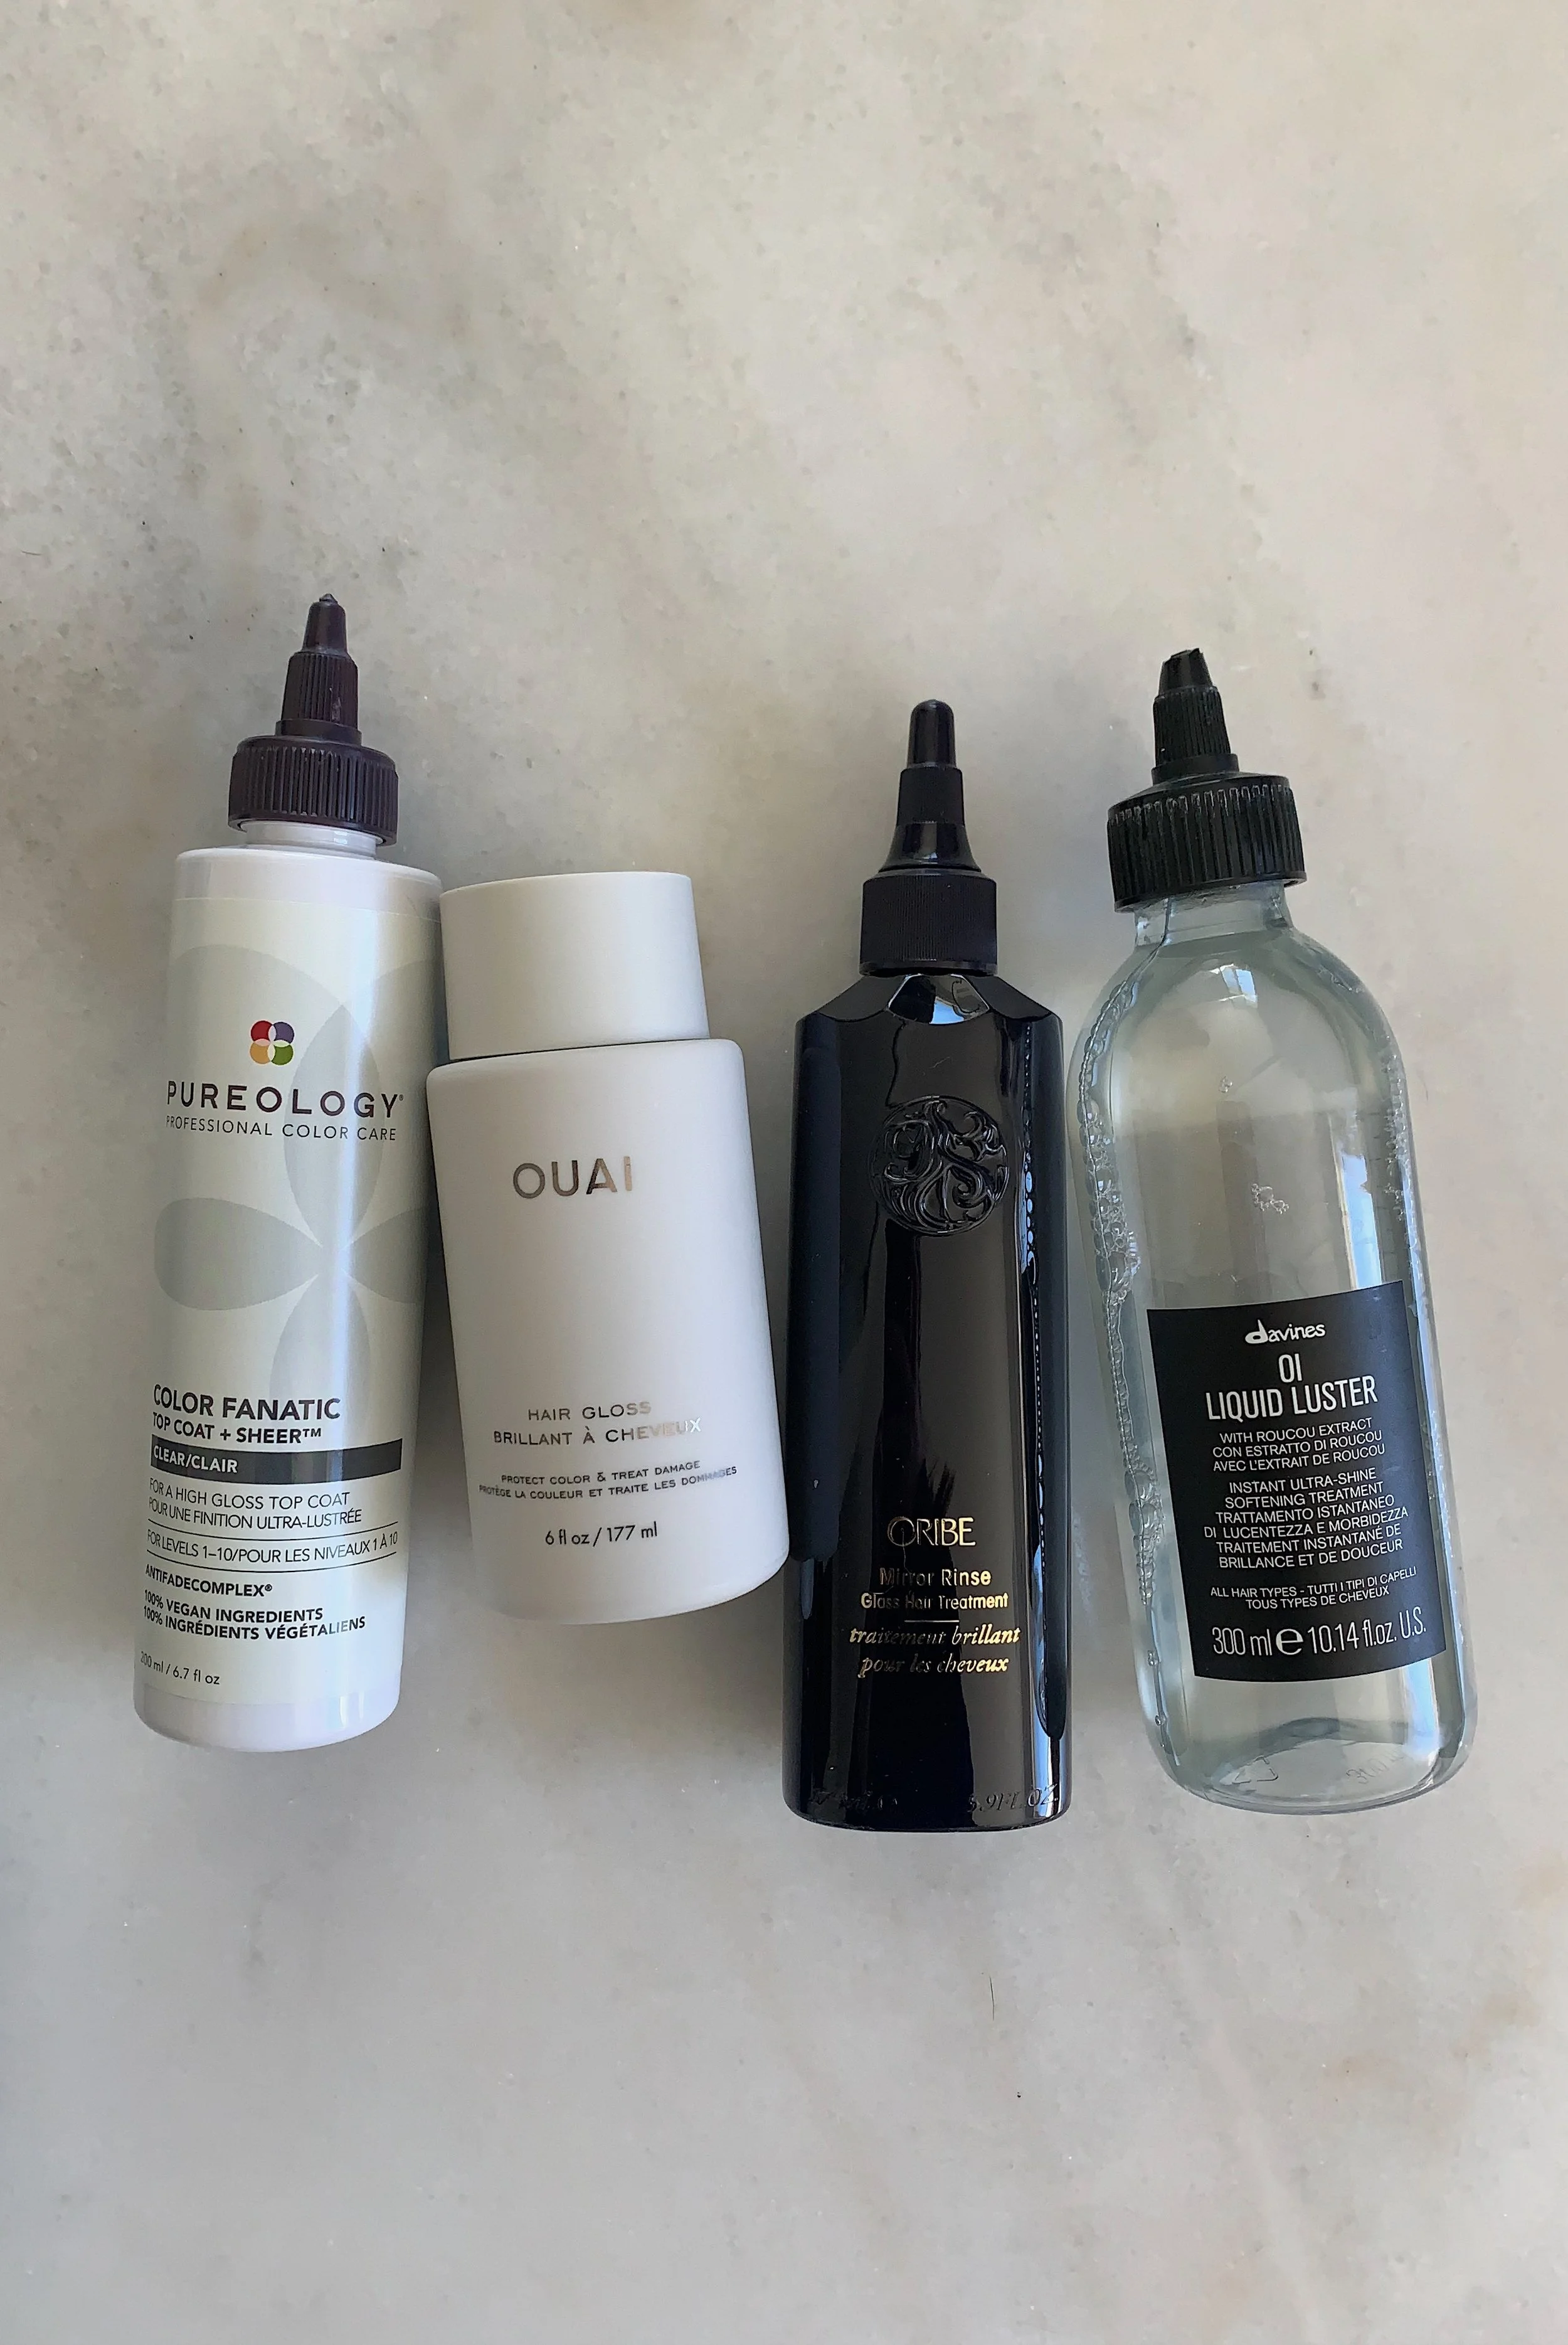
Davines Oi Liquid Luster - Pricey at $57 per bottle, but it’s so, so good. This is my go-to gloss (and hair treatment) before special events or family pictures because it makes your hair GLOW like no other. A little goes a long way; I’ve had the same bottle for a year and half now and that’s the only reason I’m able to justify the price. The other downside is the scent; the Davines Oi scent is very polarizing. I find it to be masculine and sharp (not my favorite), but it’s worth overlooking for this gloss as opposed to the Oi shampoo, conditioner, etc. This gloss is great if you’re short on time, as you don’t have to let it sit and can wash it out instantly. It’s a watery consistency, whereas most glosses are conditioner-like, so I love it for fine hair and curls. Lastly, my mom has wiry grey hair and loves how this gloss makes her hair sleek and shiny. Check out my review with before after photos here.
Pureology Color Fanatic Top Coat Clear Hair Gloss - Not necessarily my go-to hair brand, but I love this gloss and think it’s such a sleeper hit; plus it’s only $38. It’s easy to use, and you get great shine if you leave it on for only 5 minutes. A creamy consistency that adds shine but doesn’t dry out your hair, I recommend this one especially for fine, fragile, and tangle-prone hair. The scent is mild; it’s kind of reminiscent of old school chemical-salon products, but with a hint of sweet. If you’ve tried hair glosses before and struggled to get the results you want, I recommend giving this one as a try as it really is so hard to “mess up,” for lack of better words. This is a clear gloss and I love the way it looks on my highlighted hair, but there’s something about it that just makes dark hair look so rich and luxurious. I have a full review with results plus tips for using.
Ouai Hair Gloss - Ouai is one of the most beloved haircare brands, and their gloss is a clear winner. I like that you can get this one anywhere (Amazon, Target, Ulta, Sephora, etc.), but you do need to make sure you don’t use too much or you risk greasy, weighed down hair. Still, it’s another awesome in-shower hair gloss that I love. Anytime I have friends over, I sneak this in the shower so they get a little salon-like TLC moment. Retails for $34, check out my review with before and after results.
Oribe Mirror Rinse Glass Hair Treatment - Another watery gloss, this makes your hair so soft and shiny. It’s the most expensive gloss ($64) on my list, and truthfully I wouldn’t say the higher price makes it better than the other ones I’ve mentioned. Still, if you are tangle-prone this is the one gloss that actually takes tangles out instead of adding more, and it’s my top recommendation if you have extensions.
FAQ
how long should you leave hair gloss on?
While there are a few instant-wash glosses, most hair glosses should be left on for 5-15 minutes. Check your label’s instructions and follow them. Hair glosses are not like other hair products where more time (or product) = better results. You will get the best results by following the time range specified. I stick to the lower end of the range, but my mom sticks to the max time typically and we both get comparable, great results.
how often should you use hair gloss?
You can use a hair gloss every 4-6 weeks on average. I personally use a hair gloss in between my salon visits, which are every 8-12 weeks. Hair glosses last a while, so they’re not a weekly treatment, per se. If you want a haircare TLC treatment you can do more frequently, stick to a hair mask or deep conditioner.
how long do hair glosses last?
Hair glosses last approximately 12-20 washes.
can you apply a hair gloss in the shower?
Yes, and that’s what I love to do as someone who prefers low-maintenance beauty. Keep a hair tie or claw clip in your shower to put your hair up and allow the gloss to soak in for that 5-15 minute range, or use the Davines Oi Liquid Luster if you want a gloss you can wash out immediately.
That said, if you are using a color depositing or tinted gloss, I recommend not applying it in the shower. They require more attention to detail, so you want to be able to take your time, look in the mirror, and really pay attention.
hair gloss vs hair dye vs toner
All are great tools in the world of hair color, but do very different things.
Hair gloss: shine-enhancing treatment you can do at home (100% beginner-friendly, I promise). Stick to the clear glosses; I have yet to hear a rave review from someone using a tinted gloss (more on that below).
Hair dye: can range from temporary to semi-permanent to permanent, all-over color to pieces highlights. Best left up to the professionals so you get a customized look that works with your hair type, undertones, and goals.
Toner: another color-based treatment that neutralizes unwanted undertones (like brassiness). Customizable and can really impact your look, so I recommend going to a stylist. That said, you can get maintenance versions at home (purple or blue shampoo, for example) to help maintain the salon look at home.
clear vs tinted hair glosses
As I’ve mentioned, I am a huge fan of clear glosses; not so much tinted or color-depositing glosses unless you’re going to a salon. While hair glosses seem like a lightweight, temporary treatment, many of the tinted glosses have permanent or semi-permanent color in them, which may send you on the road to an expensive color correction with your stylist.
I’ve heard (and seen) so many horror stories where the tint on the hair gloss box looks neutral, but pulls warm on the hair and leaves it a brassy mess. And while the purple or dark cherry tinted glosses look like they’ll provide a subtle shift on darker hair, they have the potential to be way too saturated and bright. Either way, if you want a tinted hair gloss, I highly recommend going to a salon for a customized color and professional expertise.
Clear glosses are for everyone though! I have highlights and get them professionally toned, but have never had a bad experience with a clear at-home gloss - no brassiness, ashiness, or color stripping. My hair health is good, and my stylist is totally okay with all of the glosses I’ve mentioned in this post.
are at-home hair glosses different from salon glosses?
Yes. Salon glosses are more customizable; I recommend going to a salon if you want a color depositing formula or a color refresh. Salon glosses last longer, but are also more expensive ($50-100+), whereas some of my favorite at-home hair glosses are under $50.
If your main goal with a hair gloss is shiny, vibrant hair and less frizz, you’ll love the results from a clear at-home gloss.
is hair gloss worth it?
Yes! Hair glosses are so underrated in my opinion. I love the look of glass-like, super shiny hair, and hair gloss helps me achieve that look at home while being budget-friendly. Hair glosses make my hair look more polished and help me feel more put together, and have allowed me go to an extra 1-3 weeks between color appointments. Whether you have highlights, color-treated hair, or rock your natural color, glosses will instantly elevate your look and I love that they work for all hair types. If you’re on the fence, I highly recommend trying one out!


